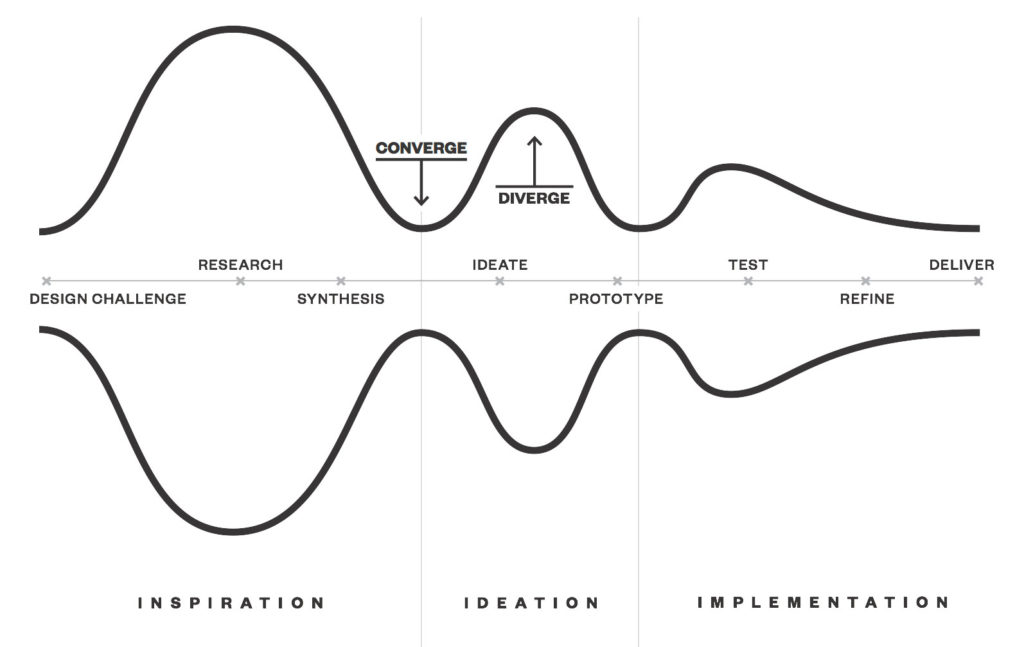
As I wrote in my last post, Design Thinking is methodology as a way to innovate and it has different models from different organizations and schools. First of all, I can not confirm that one framework is better than another. It matters how it is used and facilitated.
When I first presented Design Thinking to my colleagues, I used the Stanford d.school model. I still like it for the same reason: it is simple, practical and easy to explain to people who have never used Design Thinking before.
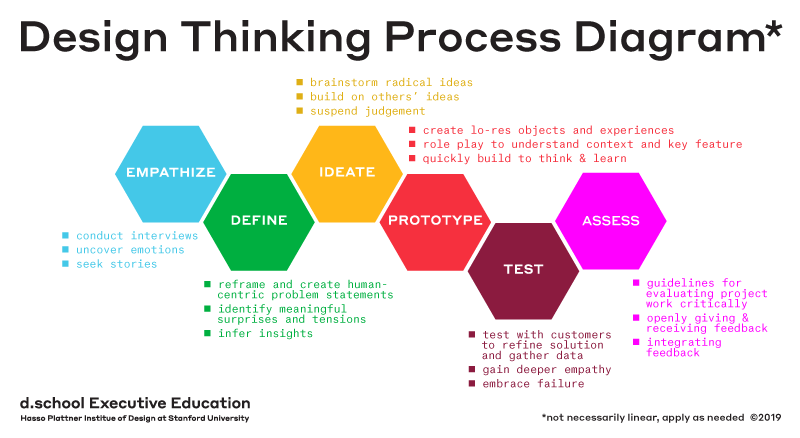
In this article, we will explore the five modes of the Stanford d.school Design Thinking process — Empathize, Define, Ideate, Prototype and Test — and look at how they can be applied in practice.
Stanford Design Thinking in a nutshell
The Stanford d.school model consists of five modes:
Empathize → Define → Ideate → Prototype → Test
The process may look linear in a diagram, but real Design Thinking rarely works that way. Teams often move back and forth between the modes as they discover new information.
A prototype may reveal that the original problem was defined incorrectly. Testing may uncover a completely new user need. A user interview may immediately inspire a prototype.
The purpose of the framework is therefore not to complete five steps in order. It is to reduce uncertainty by learning from users and experiments.
Hasso Plattner Institute of Design: Pioneering Design Thinking at the d.school
The Hasso Plattner Institute of Design at Stanford, commonly known as the d.school, a place for explorers and experimenters at Stanford University
The Institute was founded by Stanford mechanical engineering professor David M. Kelley, six other professors and George Kembel in 2004. The program integrates business, law, medicine, the social sciences and humanities into more traditional engineering and product design education.
We believe everyone has the capacity to be creative. The Stanford d.school is a place where people use design to develop their own creative potential.
quote from dschool.stanford.edu;
Key Insights from Stanford d.school
Stanford d.school offers several key insights that can enhance the practice of design thinking:
- Interdisciplinary Collaboration: The d.school emphasizes collaboration among individuals from diverse backgrounds, including designers, engineers, business professionals, and more. This interdisciplinary approach fosters unique perspectives, creative synergy, and holistic problem-solving.
- Bias Towards Action: Stanford d.school encourages a bias towards action and rapid prototyping. By embracing experimentation and learning through doing, designers can uncover valuable insights and refine their solutions iteratively.
- Human-Centered Design: The d.school advocates for a deep understanding of users’ needs, aspirations, and challenges. By empathizing with users, designers can develop solutions that truly resonate with their target audience.
The Design Thinking Process
The five stages of Design Thinking, according to d.school, are as follows: Empathise, Define, Ideate, Prototype, and Test.
1. Empathize
The Empathize mode is the work you do to understand people, within the context of your design challenge. During this stage, we are working with users a lot. Observing what people do and how they interact with their environment gives you clues about what they think and feel.
Sometimes a good conversation can surprise both the designer and the subject by the unanticipated insights that are revealed. View users and their behavior in the context of their lives.
Prepare some questions you’d like to ask, but expect to let the conversation deviate from them. Ask someone to show you how they complete a task. Have them physically go through the steps, and talk you through why they are doing what they do. Ask them to vocalize what’s going through their minds as they perform a task or interact with an object.
Have a conversation in the context of someone’s home or workplace – so many stories are embodied in artifacts. Use the environment to prompt deeper questions.
Empathize example
Imagine that a company wants to improve its internal IT support portal.
The initial assumption might be that employees need better documentation. But after observing several employees trying to solve real problems, the team discovers something different: people can often find the documentation, but they do not know whether they should use self-service, open a ticket or contact somebody directly.
That observation changes the problem completely.
This is why empathy is not about imagining what users want. It is about discovering what actually happens in their environment.
2. Define
The Define mode of the design process is all about bringing clarity and focus to the design space. The goal of the Define mode is to craft a meaningful and actionable problem statement – this is what we call a point-of-view.
The Define mode is sense-making. It results in your point-of-view (POV): the explicit expression of the problem. The Define mode is also an endeavor to synthesize our findings into insights.
The final point-of-view has to combine these three elements – user, need, and insight – as an actionable problem statement that will drive the rest of your design work.
A good point-of-view is one that:
- Provides focus and frames the problem
- Inspires your team
- Informs criteria for evaluating competing ideas
- Empowers your team to make decisions independently in parallel
- Captures the hearts and minds of people you meet
- Saves you from the impossible task of developing concepts that are all things to all people
Define example
Using the same IT support example, the original problem might have been:
We need a better support portal.
After research, a more useful point-of-view could become:
Employees need a simple way to understand the correct support path because choosing the wrong channel creates delays and unnecessary handoffs.
Notice the difference.
The first statement already assumes the solution is a new portal. The second describes a user problem and leaves room for many possible solutions.
A useful way to continue is to convert the problem into a How Might We question:
How might we help employees confidently choose the correct support path in less than one minute?
3. Ideate
Ideate is the mode of the design process in which you concentrate on idea generation. We ideate in order to transition from identifying problems to creating solutions for our users.
Particularly early in a design project, ideation is about pushing for a widest possible range of ideas from which you can select, not simply finding a single, best solution.
Techniques like Brainstorming, affinity diagram can be used. After collecting as many ideas as you could, ask the team to vote. Two or three of the most promising ideas can then be moved forward into prototyping.
The determination of the best solution will be discovered later, through user testing and feedback.
Ideate example
For the same challenge, the team could generate very different ideas:
- a simple three-question decision tree;
- an AI support assistant;
- automatic ticket classification;
- role-specific support pages;
- contextual help inside business applications;
- a visual “where should I go?” guide;
- or even removing unnecessary support channels.
The purpose of ideation is not to immediately find the smartest idea.
It is to avoid falling in love with the first obvious solution.
Generate alternatives first. Evaluate them later.
4. Prototype
The Prototype mode is the iterative generation of artifacts intended to answer questions that get you closer to your final solution. In these early stages, you should create low-resolution prototypes that are quick and cheap to make (think minutes and cents) but can elicit useful feedback from users and colleagues.
A prototype can be anything that a user can interact with. A wall of post notes, a gadget you put together, a role-playing activity, or even a storyboard.
Don’t spend too long. The point of the stage is to answer a particular question. The prototype should be built with the user in mind.
Prototype example
You do not need to build the AI assistant or redesign the entire support portal.
If your main question is:
Can employees understand which support channel they should use?
you could create a clickable three-screen prototype or even a paper sketch.
Give it to several employees and observe what happens.
A prototype should therefore be designed around a question you want to answer, not around how closely it resembles the final product.
5. Test
The Test mode is when you solicit feedback, about the prototypes you have created. Show them to your users and have another opportunity to gain empathy for the people you are designing for.
Ideally, you can test within a real context of the user’s life. Try to create a scenario in a location that would capture the real situation. Listen to what they say about it, and the questions they have.
Test example
Instead of asking:
Do you like this solution?
give the user a realistic task:
Your production reporting application has stopped working. Show me what you would do.
Then observe.
Where does the person hesitate?
What do they misunderstand?
What do they expect to happen next?
These behaviors often provide more useful information than simply asking users whether they like the prototype.
Iteration and making the process your own
Iteration is a fundamental part of good design
Although the Stanford model is usually presented as:
Empathize → Define → Ideate → Prototype → Test
Design Thinking is not a rigid linear process.
You may test a prototype and discover that your original problem statement was wrong. You may return to Empathize after testing. You may prototype several ideas during Ideation before choosing which direction to explore.
Moving backwards does not mean the process has failed.
In many cases, discovering that an assumption was wrong is exactly the learning you were looking for.
The objective is not to successfully complete five stages.
The objective is to learn enough to make the next decision better.
How to Use AI with the Stanford Design Thinking Process
Generative AI can make several parts of Design Thinking faster, but it should be used as a thinking partner rather than a replacement for users.
AI can be particularly useful for:
- summarizing interview notes;
- finding patterns across user feedback;
- generating alternative problem statements;
- creating How Might We questions;
- generating a wider range of ideas;
- challenging assumptions;
- creating prototype copy or mock data;
- organizing feedback from testing.
There is one important limitation.
If AI tells you what your users supposedly think, that is not user research.
Treat AI-generated user insights as hypotheses that need to be validated with real people.
A useful workflow is:
Real user research → AI-assisted synthesis → human judgment → prototype → real user testing
rather than:
AI → assumed user needs → build the product
AI across the five Design Thinking modes
Empathize: use AI to summarize interviews, cluster observations and suggest follow-up questions.
Define: ask AI to identify patterns, assumptions and alternative ways of framing the problem.
Ideate: use AI to dramatically expand the solution space and generate ideas from different perspectives or industries.
Prototype: use AI to quickly generate copy, scenarios, interface variations, sample data or simple code.
Test: use AI to organize feedback and identify recurring patterns — while keeping actual users at the center of the test.
Try It: Use AI as Your Design Thinking Facilitator
Copy the prompt below into ChatGPT or another AI assistant and replace the information inside brackets.
Act as my Design Thinking facilitator using the Stanford d.school framework:

Empathize → Define → Ideate → Prototype → Test.

My challenge:
[describe the problem]

Target users:
[describe the people affected]

What I already know:
[paste research, observations, feedback or write "none"]

Constraints:
[time, budget, technology, team, regulations, etc.]

Do not jump directly to solutions.

First separate what we KNOW from what we ASSUME.

Then guide me through the following process:

1. EMPATHIZE
Identify what we know about the users and what we still need to learn.
Generate 10 questions that would help me understand the problem better.
Do not invent user research.

2. DEFINE
Identify patterns in the information.
Create 3 alternative problem statements using:
[USER] needs [NEED] because [INSIGHT].
Then create 5 "How Might We?" questions.

3. IDEATE
Generate 20 substantially different solutions.
Include low-cost, process, technology, non-technology and unconventional ideas.
Do not rank them until all ideas have been generated.

4. PROTOTYPE
Select 3 promising ideas.
For each one, identify the riskiest assumption and suggest the cheapest prototype that could test it.

5. TEST
Create a simple user test:
- realistic task
- what to observe
- questions to ask
- success signals
- failure signals

Finally create three lists:

WHAT WE KNOW
WHAT WE ASSUME
WHAT WE NEED TO LEARN

Recommend the single next experiment that would reduce the most uncertainty.

Important:
Challenge my assumptions.
Do not assume that technology is the solution.
Clearly separate evidence from AI-generated hypotheses.
The purpose of using AI this way is not to let it design the solution for you.
It is to help you explore more possibilities, challenge assumptions and move through the learning cycle faster.
Do not forget to visit the section with free templates and worksheets on the subject.